Stiff Sourdough Starter Recipe
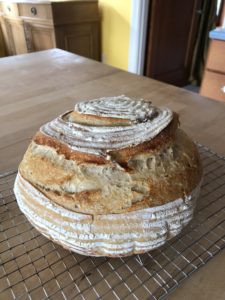
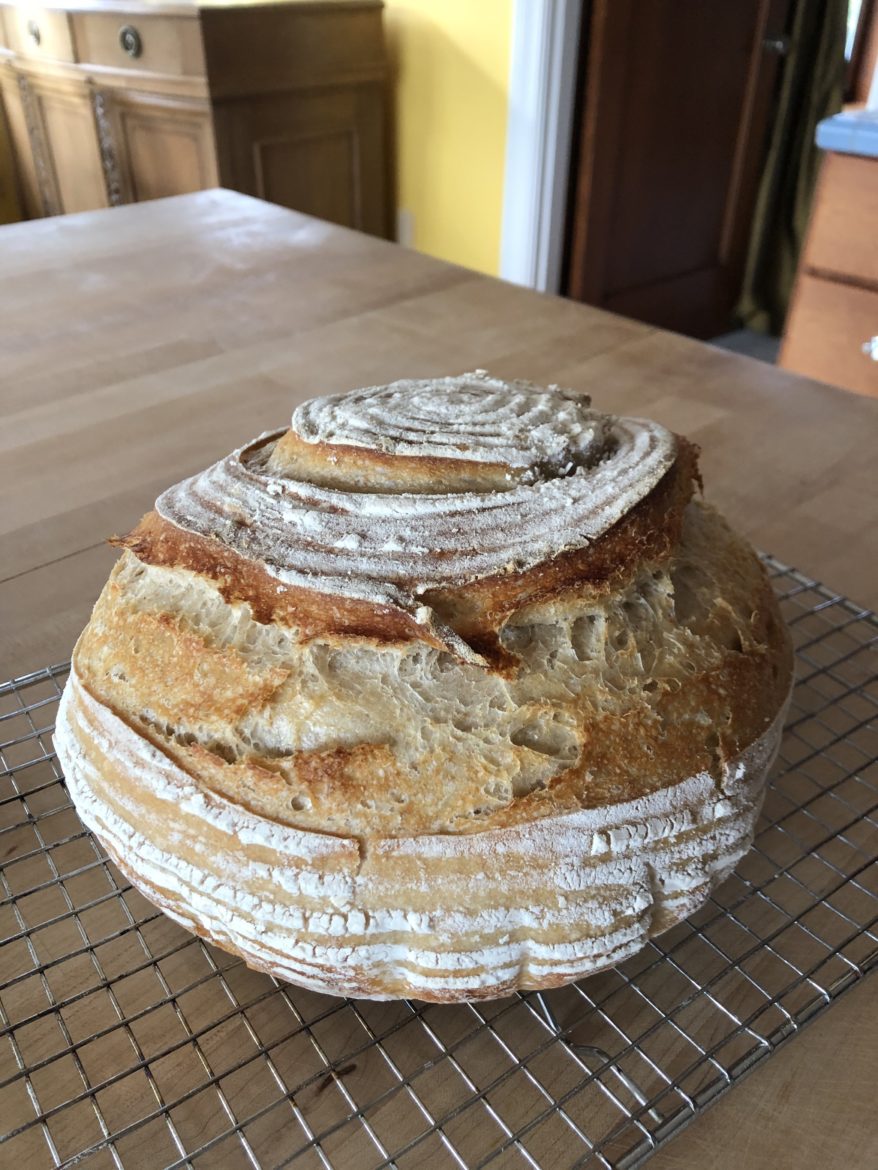
You say you can’t get your sourdough loaf to rise properly. Well I have the solution, stiff sourdough starter. Use the sourdough starter in the no-knead or traditional process. I have included a recipe which takes more time then the no-knead, but it is virtually a no-knead bread. Treat yourself and your family to this beautiful boule. Perfect for entertaining and if it drys out use it for toast the next day. Delicious with slices of avocado and olive oil. For a healthy breakfast and quick snack.

First Feeding
1 cup (227g) sourdough starter, unfed/discard*
1 scant cup (113g) Unbleached All-Purpose Flour
*Use starter that’s 100% hydration: equal parts flour and water by weight.
Second Feeding
1/4 cup (57g) room-temperature water
1/4 cup (57g) lightly packed stiff starter (from first feeding above)
1 scant cup (113g) Unbleached All-Purpose Flour
For the first feeding: Mix the liquid starter and flour together in a bowl until the dough becomes a shaggy mass. Knead until the dough becomes smooth and firm and there are no dry spots. You may need to add an extra tablespoon or two of flour if the dough feels very sticky.
Place the starter in an oiled container with the lid on and allow it to ferment at room temperature for approximately 8 hours.
For the second feeding: Tear the stiff starter into pieces, and place it in a bowl. Add the water and flour. Mix and then knead to make a firm, smooth dough, with no dry pockets of flour. This should only take a few minutes.
Place the starter in a bowl, and cover the bowl with plastic.
Sourdough Bread Recipe made with Stiff Starter
Yields 1 large loaf
2 1/8 cups (473 ml)water
1/2 cup (118 ml) gently packed ripe stiff sourdough starter
4 3/4 cups (563.18g) unbleached all-purpose flour
1 cup (136g) Whole wheat flour
2 1/2 teaspoons (8.19g) kosher salt
Use 1/2 cup of the stiff sourdough starter. Add the stiff starter by ripping small pieces of the starter into the measured water for your bread. Add the flour and salt, and stir the ingredients until the dough becomes shaggy.
Scrape the dough out of the bowl and smear the dough with the heel of your hand, so that all the flour hydrates and the starter begins to break down. This should only take 1 to 2 minutes. Make sure there are no remaining dry pockets of flour. Return the dough the bowl.
Cover the bowl with plastic wrap and allow the dough to rest for 30 minutes.
Knead the dough by hand for 2 minutes, then place it in an oiled bowl and cover it with plastic wrap.
Let the dough rise for 1 hour at warm room temperature. If cooler it may take 75 to 90 minutes.
Gently deflate the risen dough by folding it over its self 4 times. Place folded side down in the bowl, and rise for another hour.
Fold the dough one more time, and let it rise for 90 minutes. The dough should feel light and airy. If it still feels stiff and cool, give it another fold and on more hour of rising.
To preshape the loaf, give the dough a light fold. Place the loaf old side up on a floured surface, cover it with Plastic wrap, and let it rest for 20 minutes.
Shape the dough into a large round, place the loaf seam side up on a heavily floured linen cloth, place in a bowl.
Refrigerate the loaf covered with plastic wrap, overnight or for up to 24 hours. About 16-18 hours of refrigeration is ideal.
The next day, preheat the oven to 450 degrees. If using a dutch oven or pizza stone make sure they are preheated also.
Just before baking, spray with water and sprinkle seeds or your choice, if desired. Use a very sharp knife or razor blade to score the bread several times across the top.
Bake for 30 minutes with the lid on, Remove the lid and continue to bake for 20 minutes, or until the loaf is rich golden brown and sound hollow when tapped on the bottom. Internal temperature should be 200 degrees.
If using a pizza stone it may take 40- 45 minutes to bake the loaf.
Remove the bread form the oven and allow it to cool on a rack before slicing.
Interesting method and am curious to try. Would you mind posting the weights in metric throughout the whole process?
TIA. Hope you are well and safe in these surreal times.
I posted the weights for you. Hope all is well with you also!
So what is % hydration for the stiff starter ?
It’s roughly 75% for regular and 50% for stiff approximately.
Great method. I would love to have the weights posted if you can. Thank you!
Sorry, next time I make it I’ll weight the ingredients.
How do I know when stiff sour dough starter is ready to use? Does it have as many
bubbles or air pockets as pics show for liquid or wet starters? Does it double in size
in a certain period of time?
The starter will bubble just as the regular consistency starter. It may or may not double but should have a good amount of growth with bubbles. When you scoop into the starter you should see a web of bubbles and it should deflate.
Hi, you posted weights for making the stiff starter. But can you also please post the weights that you use for all the ingredients under the recipe heading:
Sourdough Bread Recipe made with Stiff Starter
Thank you!
I posting the recipe in metrics for you.
This design is steller! You obviously know how to keep a reader amused.
Between your wit and your videos, I was almost moved to
start my own blog (well, almost…HaHa!) Great job. I really enjoyed what you had to
say, and more than that, how you presented it.
Too cool!
Thank you, lyda!
Hi. Question about the 2nd feeding. Once all combined and covered with plastic, does it need to rest/rise for a certain amount of time before staring the recipe? If so, how much time does the 2nd feeding need to ferment? Thanks. Looking forward to trying this recipe!
If you take out the sourdough in the refrigerator, I suggest you feed the day before and leave it out on the counter to rise. The sourdough will work on the flour you just added to allow it to rise considerably. Then start your recipe when the sourdough is hungry the next day. This way you will ensure that you have a powerful yeast that will allow you to get a great crumb.
Is it necessary to begin with the large amounts for the first feeding when only a small portion of it is used in the second feeding?
Start with a small amount until you get the right consistency.
Yes, but make sure it is not to stiff but more like bread dough.